This section presents the steps required for a first run of VIVO.
Summary
1) Compiling the VIVO code
| Step | Details |
|---|---|
a) Compile code from ETV menus |
|
b) Compilation resultAfter executing the code, you should see the following appearing |
|


2) Starting Solr: the indexing utility needed to run VIVO.
| Step | Details |
|---|---|
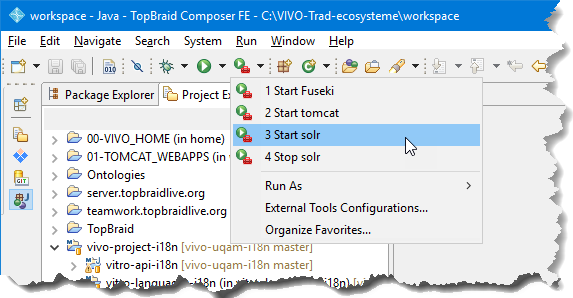
a) Start SolrIt is necessary to start Solr "only once" at the beginning of the working session. |
|
b) Giving Java access permissions for the SolrSometimes this window appears the first time Solr is started depending on your firewall configuration |
|
c) The result of the execution of Solr |
|


3) (Only for ETV Fuseki installation) Starting Fuseki: the utility needed to manage Vivo datasets
| Step | Details |
|---|---|
a) Starting Fuseki |
|
b) The result of Fuseki's execution |
|
c) Check that Fuseki is working properly |
|


4) Starting VIVO via TOMCAT
| Step | Details |
|---|---|
a) Starting Tomcat |
|
b) Effect -1 Starting a console |
|
c) Effect - 2 Information in the execution window |
|
d) ValidationGo to http://localhost:8080/vivo The first vivo startup can take up to 10 to 15 minutes to load data into the Fuseki/TDB database. |
|
e) Validation SuiteAfter clicking, enter the login to access Vivo in administrator mode. UserName: vivo@uqam.ca Password: rootPassword |
|


3) Shutting down VIVO
| Step | Details |
|---|---|
Closing the Vivo Runtime Window |
|
